The Beginnings QAL

Block 2 the Pinwheel (Printable PDF)
(8" Finished)
Cut:
As promised I made a cut file for The Maker. You can find it here. I made this so it would cut all of the pieces you need of the focus fabric for this quilt. Use 2 - 5" squares of the focus fabric and the background fabric. Put the rest in the zip lock bag with your other pieces from last month and save them for later months.

For One
Block
Cut:
2 – 5” squares of Focus Fabric
2 – 5” squares of background fabric
Here is a video of me sewing this block to help you understand the instructions. I hope you like it :)

Instructions:
1. Mark the back of each of your background squares with a diagonal line from corner to corner.
1. Mark the back of each of your background squares with a diagonal line from corner to corner.
 2.
Place one focus fabric square right side together with
one background square matching all the edges.
2.
Place one focus fabric square right side together with
one background square matching all the edges. 3.
Pin on either side
of the diagonal line far enough away to allow the presser foot to pass down either
side of the line. This is just to keep the fabrics from shifting.
3.
Pin on either side
of the diagonal line far enough away to allow the presser foot to pass down either
side of the line. This is just to keep the fabrics from shifting.  4.
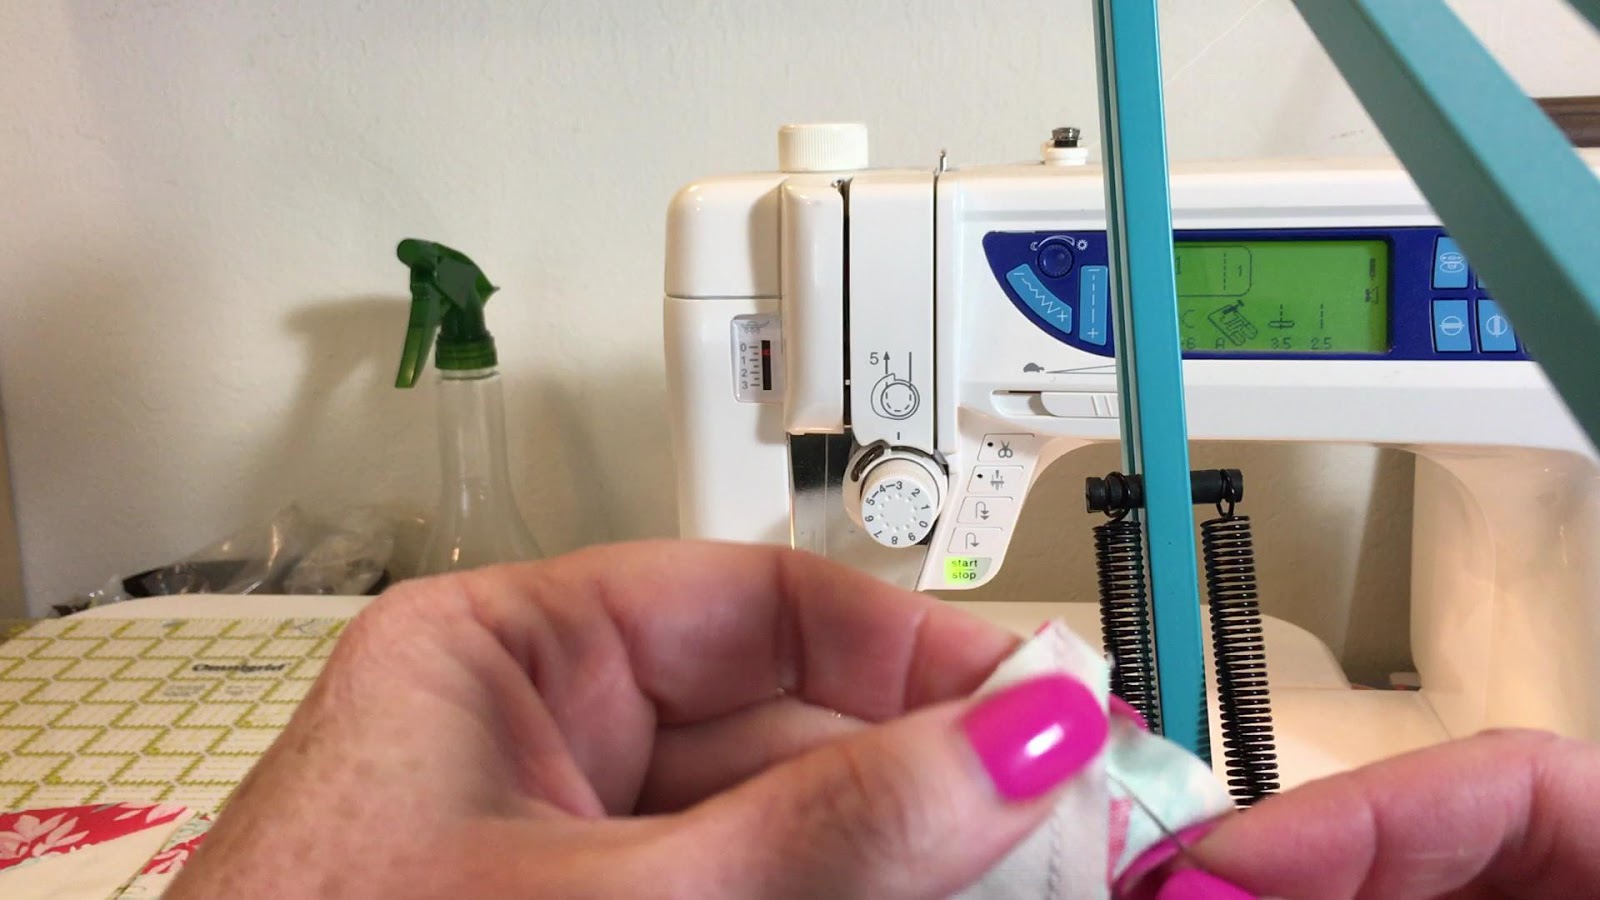
Using your ¼” foot
sew ¼” away from the diagonal line on the left. If you have a foot with an edge
for the ¼” you might want to adjust your presser foot pressure so that it is
lighter. This will keep your foot from making your fabric shift.
4.
Using your ¼” foot
sew ¼” away from the diagonal line on the left. If you have a foot with an edge
for the ¼” you might want to adjust your presser foot pressure so that it is
lighter. This will keep your foot from making your fabric shift. 5.
Go ahead and chain piece the second set of
squares by repeating step 3 and 4
5.
Go ahead and chain piece the second set of
squares by repeating step 3 and 4 6.
Turn the blocks
around and sew a ¼” seam on the opposite side of each of the diagonal lines.
6.
Turn the blocks
around and sew a ¼” seam on the opposite side of each of the diagonal lines. 
9.
Lay out the blocks
so that they form a pinwheel.

 10.
Turn the top right
block so that it is right side together with the left top. Nestle the seams and
pin close to the end. Sew a ¼” seam. Repeat with the bottom row. Press toward
the dark side. This will make one row pressed to the left and one pressed to
the right allowing you to nestle your last seam.
10.
Turn the top right
block so that it is right side together with the left top. Nestle the seams and
pin close to the end. Sew a ¼” seam. Repeat with the bottom row. Press toward
the dark side. This will make one row pressed to the left and one pressed to
the right allowing you to nestle your last seam. 11.
Put the two rows right
sides together and nestle the center seam. Look at each side and find the one
where you can see the three seams come together in a point. Put a pin through
the point from the wrong side.
11.
Put the two rows right
sides together and nestle the center seam. Look at each side and find the one
where you can see the three seams come together in a point. Put a pin through
the point from the wrong side. 12.
Put the point of
the pin through the point on the right side of the other row.
12.
Put the point of
the pin through the point on the right side of the other row.
13.
With the pin
straight through both rows nestle the seams and pin on each side of the center
seam. Make sure that the pin stays standing up straight to keep those points
together.


 14.
Remove the pin in
the center after you have a pin on each side of the seam.
14.
Remove the pin in
the center after you have a pin on each side of the seam.  15.
15.
 Put a pin in the
end of where your seam will be as always to keep things from shifting.
Start your seam. When you get to about an inch from the center of the block
where your points are going to match up slow down. You want your seam to go
right where those three seams make a point where you had your center pin. Be very
slow and careful there. I used grey thread so you can see better.
Put a pin in the
end of where your seam will be as always to keep things from shifting.
Start your seam. When you get to about an inch from the center of the block
where your points are going to match up slow down. You want your seam to go
right where those three seams make a point where you had your center pin. Be very
slow and careful there. I used grey thread so you can see better. 
 16.
Open and have a
look… if the points aren’t perfect pick out the seam and try again. You only need
to pick out a few stitches right in the middle to fix it.
16.
Open and have a
look… if the points aren’t perfect pick out the seam and try again. You only need
to pick out a few stitches right in the middle to fix it.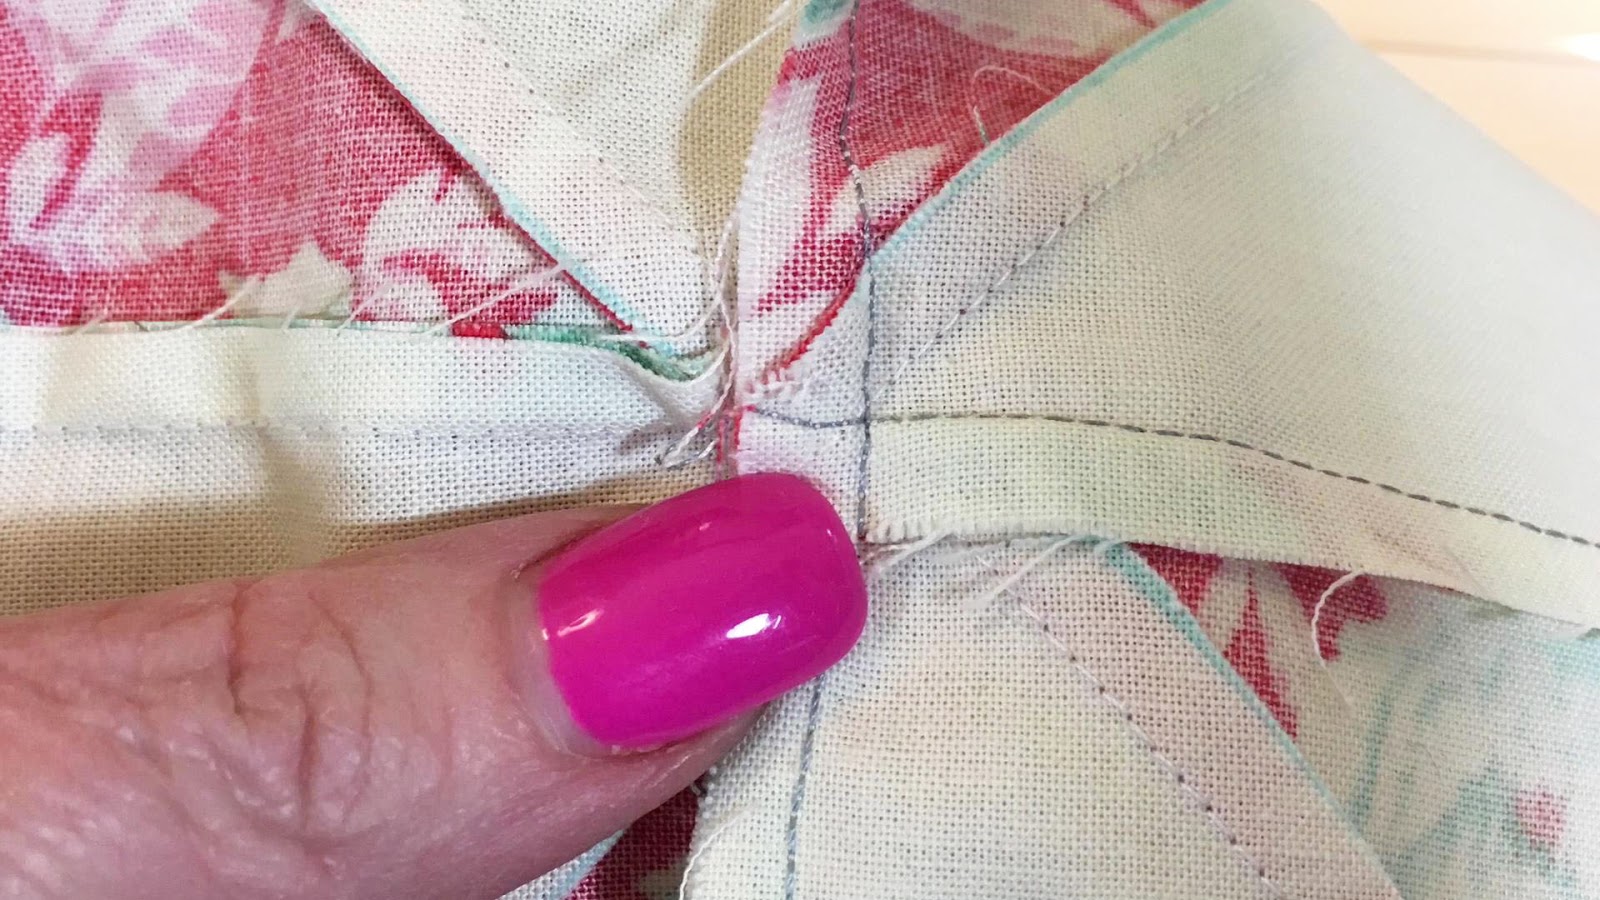
17.
This is optional but
I personally like to do it to make my block nice and flat. Before you press the
final time. Pick out the 3 or so stitches in the center that hold the two seams
together. Right there where my fingernail is pointing.
 18.
Press the seams toward
the dark sides which will make them go opposite each other. It will make your
block flatter (no big lump in the center) and it makes a cute little pinwheel
in the center 😊 The block should be 8 ½” unfinished.
18.
Press the seams toward
the dark sides which will make them go opposite each other. It will make your
block flatter (no big lump in the center) and it makes a cute little pinwheel
in the center 😊 The block should be 8 ½” unfinished.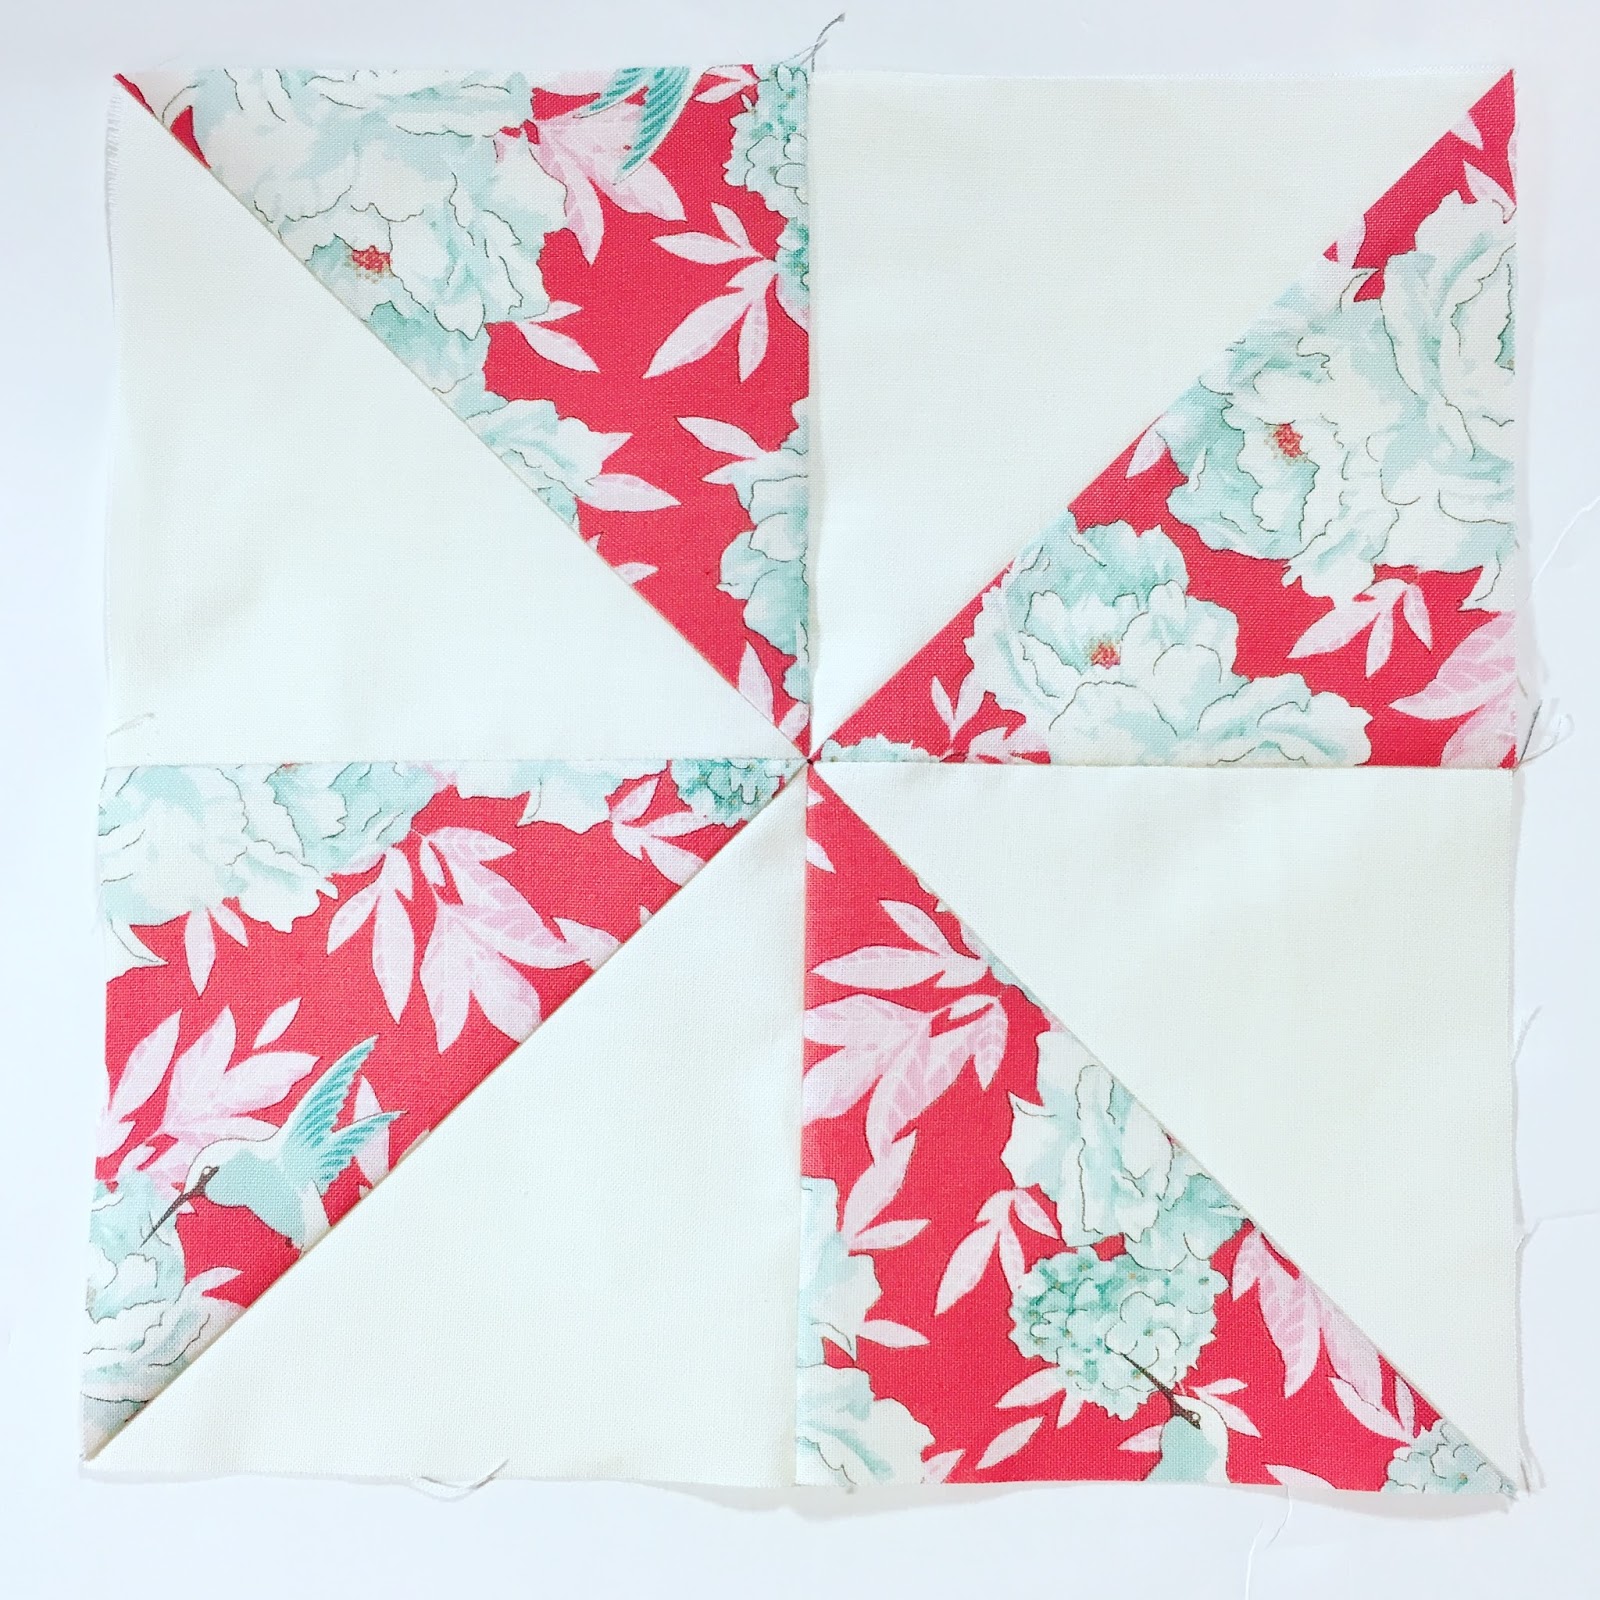
Stop back by tomorrow for a peek at my Quilter's Planner block and the new Quilter's Planner Stickers for March.
See Ya Then!
Love,
Julie


Hey Julie, I'm getting an error when I click on the PDF file.
ReplyDeleteThanks Billie, it is working now.
DeleteSo I am. Not Found. Error 404. Please Help and thank you for Block 2.
ReplyDeleteIt is fixed... you might need to refresh the page if you are still getting the error.
DeleteAre we to make 2 pinwheel blocks?
ReplyDeletesorry I do want a reply do me make 2 pinwheel blocks?
ReplyDeleteNo, just one pinwheel.
ReplyDelete