Hey Everyone!
I had a feeling you all were ready to do a fun picture block. The piecing is easy on this one you just have to pay attention to center each of the rows. I am going to show you how to add sashing to your 9 Patch and Friendship Star row first because it employs the same technique as putting together the rows in the block does.
Have you ever seen a quilt with wavy edges? It happens a lot if the borders or sashing get stretched or if they are cut the wrong size to begin. If you are making borders for a quilt. You should measure the center of the quilt from bottom to top while it is laying flat. Make your borders that length. Sew the side borders on. Then measure your quilt in the center from the right to the left and make your top and bottom borders that length. It doesn't matter what size the quilt was supposed to be originally if your blocks are a slightly different size your borders might not be what the pattern says they should be use reality rather than the pattern in this case.
Any time you are putting together a sashing or a border you need to pin this way.

Put the sides on first. Find the center of your row or quilt and pin the center of the sashing or border. Then your ends. Then work between those pins. First the middle between the center of the row and the end. Then the middle between those and so on... While you are working be careful not to stretch your sashing. Handle it carefully and don't wrench it around to avoid stretching it.
If you start from one side of the row and just start sewing on the sashing you will end up stretching it. You will have a ruffle when you are done or you will have a bunch of the sashing left hanging off the end which will mean that your sashing will be too short and the outer edges will be shorter than your row actually is... which will make it mound up in the middle like a hill ... we don't want ruffles or hills we want a flat quilt.
Please watch my video which I hope will illustrate this better. it is also the video for the block which is below.

Instructions:
Love,
I had a feeling you all were ready to do a fun picture block. The piecing is easy on this one you just have to pay attention to center each of the rows. I am going to show you how to add sashing to your 9 Patch and Friendship Star row first because it employs the same technique as putting together the rows in the block does.
Have you ever seen a quilt with wavy edges? It happens a lot if the borders or sashing get stretched or if they are cut the wrong size to begin. If you are making borders for a quilt. You should measure the center of the quilt from bottom to top while it is laying flat. Make your borders that length. Sew the side borders on. Then measure your quilt in the center from the right to the left and make your top and bottom borders that length. It doesn't matter what size the quilt was supposed to be originally if your blocks are a slightly different size your borders might not be what the pattern says they should be use reality rather than the pattern in this case.
Any time you are putting together a sashing or a border you need to pin this way.

Put the sides on first. Find the center of your row or quilt and pin the center of the sashing or border. Then your ends. Then work between those pins. First the middle between the center of the row and the end. Then the middle between those and so on... While you are working be careful not to stretch your sashing. Handle it carefully and don't wrench it around to avoid stretching it.
If you start from one side of the row and just start sewing on the sashing you will end up stretching it. You will have a ruffle when you are done or you will have a bunch of the sashing left hanging off the end which will mean that your sashing will be too short and the outer edges will be shorter than your row actually is... which will make it mound up in the middle like a hill ... we don't want ruffles or hills we want a flat quilt.
Please watch my video which I hope will illustrate this better. it is also the video for the block which is below.
The Beginnings QAL (printable PDF)
Block 5 Farmer Jill (8” Finished)
For One
Block (that is what you need for the quilt)
Cut:
3 – 1 ½” by Width of Fabric Strips
Subcut:
2
– 32 ½” x 1 ½” sashing strips (for the friendship Star and Nine Patch row)
2
– 6 ½” x 1 ½” sashing strips (for the friendship Star and Nine Patch row)
2
– 3 ½” x 1 ½” rectangles (mark as piece A)
1
– 2 ½” x 1 ½” rectangle (mark as piece B)
2
– 4” x 1 ½” rectangles (mark as piece D)
1 – 2 ½” by Width of Fabric strip
Subcut:
2
– 5 “ x 2 ½” rectangles (mark as piece F)
1
– 3” x 2 ½” rectangle
Subcut
2 – 3” x 1” rectangles (mark as piece C)
1 – 2 ½ x 1 ½”” rectangle of each Hat Fabric and Shirt
Fabric (mark as piece B)
1 – 3 ½” x 1” rectangle Hat Fabric (mark as piece L)
2 – 3” x 1 ½”” rectangle Shirt Fabric (mark as piece E)
1 – 2” by Width of Fabric Strip of Overalls Fabric
Subcut:
2 – 2 ½” x 2”
rectangles Overalls Fabric (mark as piece G)
2 – 1 ½” x 1”
rectangles Overalls Fabric (mark as piece H)
2 – 1 ½” x 2”
rectangles Overalls Fabric (mark as piece I)
1 – 4 ½” x 2”
rectangles Overalls Fabric (mark as piece K)
1 – 1 ½” square of each Face Fabric and Overalls Pocket
Fabric (mark
as piece J)
Instructions:
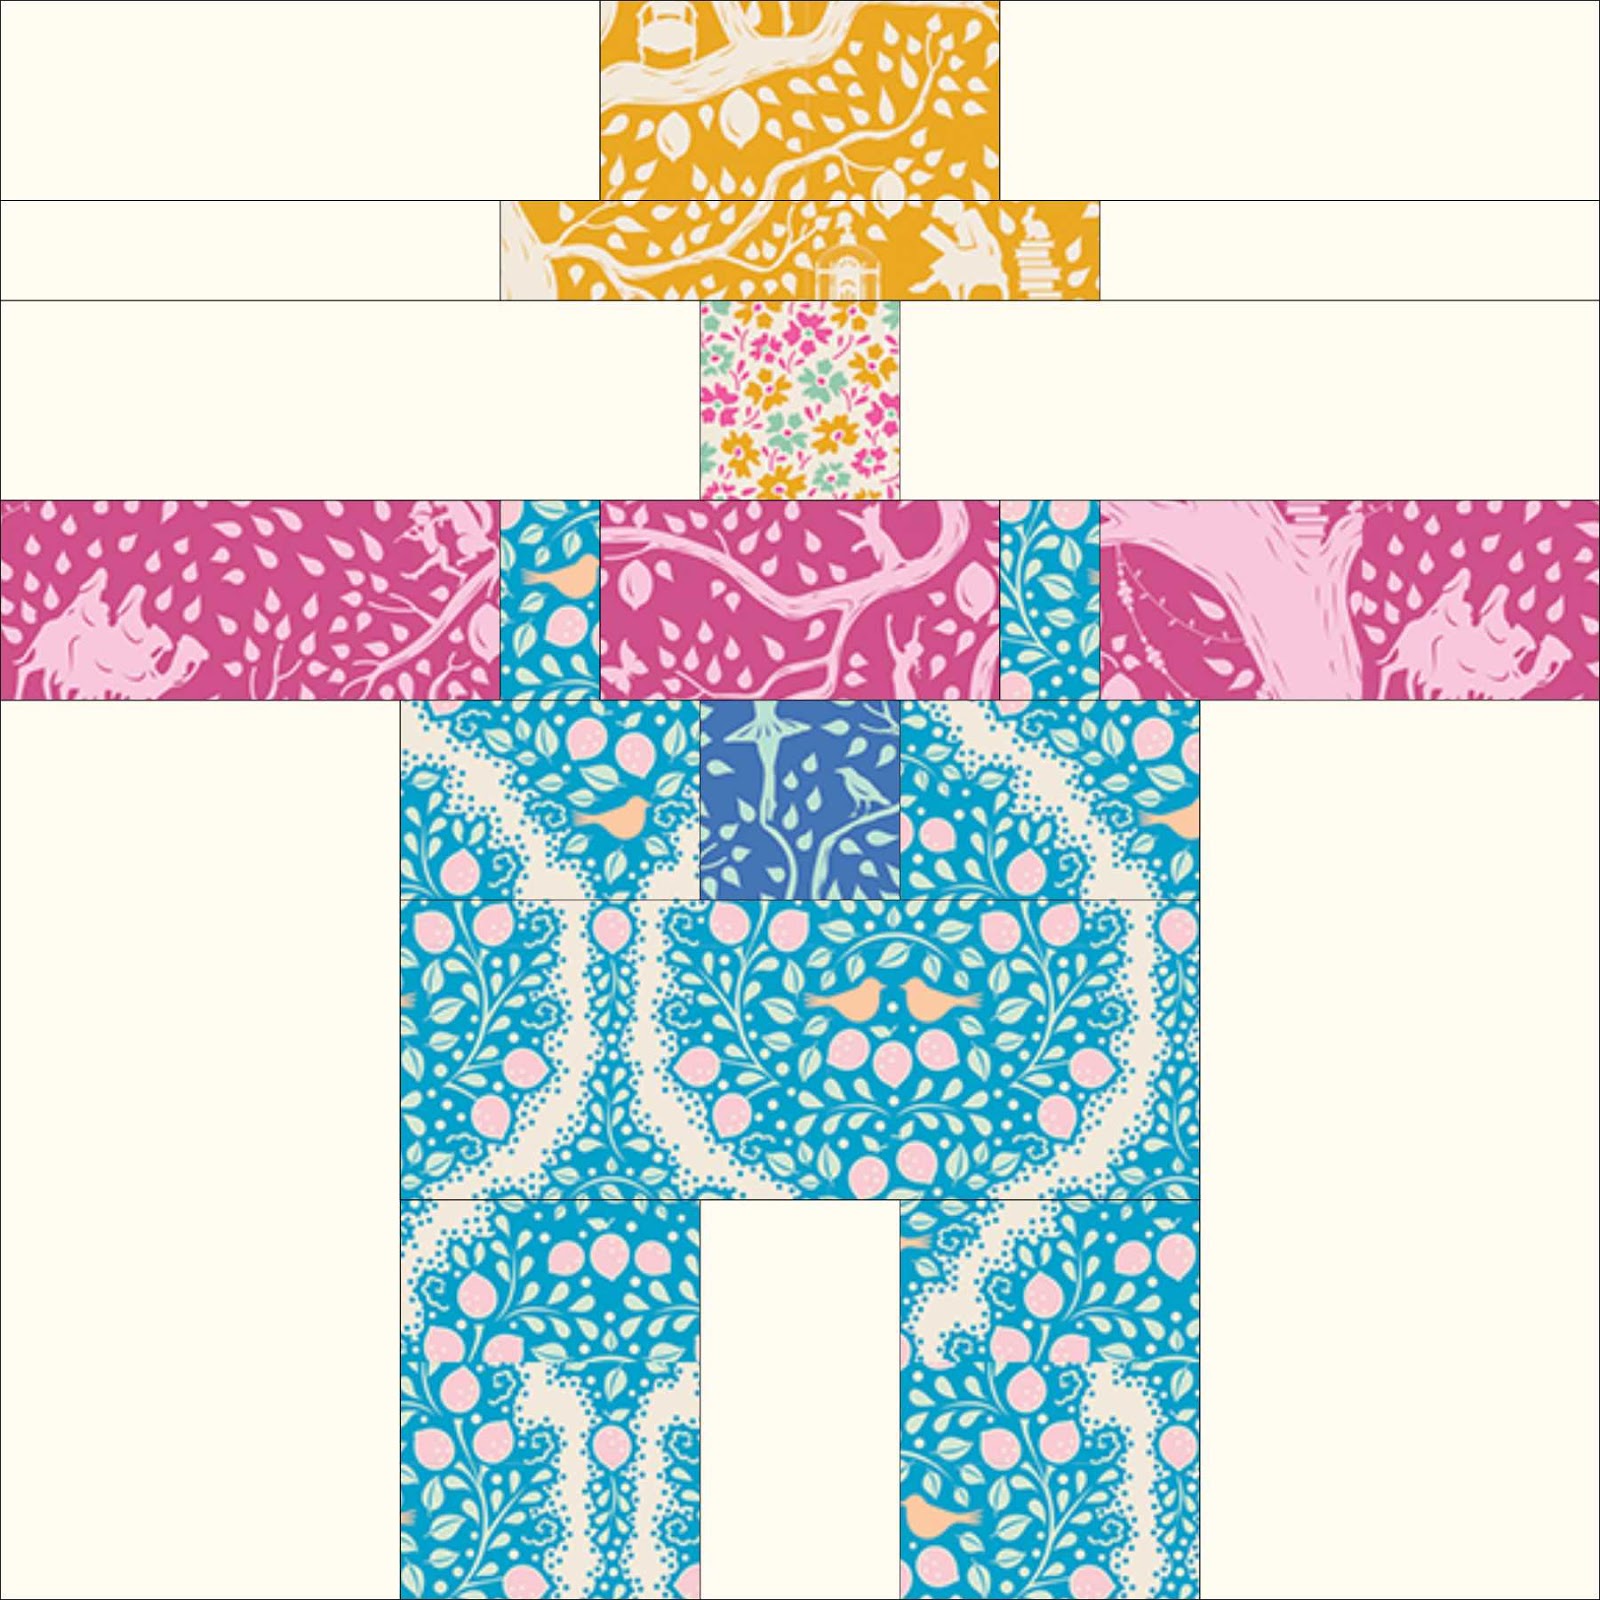
- Using this diagram lay out your pieces in rows. I like to do this on my large square ruler so I can move the pieces around for sewing and ironing without getting the pieces out of order.


- Sew the ABA, CLC, DJD, EHBHE, IJI, and GBG rows together

- Find the centers of the rows. Matching the centers (there are no seams
to match) pin at the centers and the ends.Sew the ABA and CLC rows
together.
 .
. - Repeat step 3 for the DJD and EHBHE rows.
- Repeat step 3 to sew the IJI row and K piece together
- Line up the Overalls pocket and the leg gap so that they are centered with each other. Sew the GBG and K piece together
- Line up the head and shirt sections by centering them and pinning. Sew the top two sections together.

- Sew pieces F to the right and left side of the Overalls block.

- Line up the head, the overalls pocket, and the leg gap. Pin and sew the top and bottom of the block together. and you are done :)


Love,


