
Welcome to Julie’s Blog!! I’m sneaking in here to steal the show today!!
Hi! My name is sally and I’m a compulsive fabric hoarder…okay, I’m a recovering fabric hoarder. Thanks to Julie and her sweet store, the Intrepid Thread, I can grab my fave fabrics which lately have inspired me beyond all reason and I can get to creating!!! I promised myself I would use all of the fabric I could as fast as I could and not be a fabric hoarder…and I’m here to help you do the same!!
Introducing my sweet Flirty Girl Promenade apron!
Here is a free tutorial just for you!!

Supplies:
All you really need is one of Julie’s fat quarter bundles!
8 fat quarters of Promenade (by Stitch Studio) (grab them here in Julie’s store!!!)
Your fun sewing machine (mine is a Janome! LOVE!!)
Quilting ruler
Rotary cutter & cutting mat
Marking pencil
D-rings
Optional:
Crocheted flowers
Eyelet lace binding
Buttons
Let’s SEW!!!

Cut 15 6.5”x9” rectangles out of various fat quarters. (I used 6 different FQs.) Arrange them how you would like to see them on your apron skirt. I am loving my design wall AKA a vinyl tablecloth from Target flannel side out on my closet doors. Clever, huh?

Sew those rows of rectangles together, ironing the seams in opposite directions with each row. Match the rows together, pinning at the seams. The seam allowances should lock together in place since they are ironed in opposite directions.

Cut out your top from another fat quarter on a fold (see above pic) on the selvage at 12”. Basically you are cutting a rectangle 12”x21”. Go ahead and leave it folded right sides together for your next step.
Sew the sides together (1/4” seam).

 Cut your straps and your waist band out of your eighth FQ. For the straps, cut 2 3” strips (21” side) and one 2”x4” piece. For the waistband, cut 3 strips 3.5” wide x21”.
To construct your straps, sew the two 3” strips together at the ends. Fold them lengthwise right side together and sew ¼” seam. Turn right side out, press and top stitch. Do the same for the 2”x4” rectangle.
To construct the waistband, sew all three strips together at the ends.


Hem one long end of the long strip. Do this by folding up the edge ½” and iron. With the iron pressing as you go, fold the raw edge under inside.

Top stitch that edge all up!!


 Mark at ¾” on either side of the four seams on the top of the skirt. Fold at the seam, mark, fold back at the mark, and pin. (see pics above)
Fold the left two seams toward the center, and fold the right two seams toward the center also.

Sew the pleats in place.

Hem the sides of the skirt.

Time for the bottom ruffle!! Grab your leftover fabric from your FQs and cut 3 strips 2”x19” and 4 strips 3”x19”. Sew the strips together at the ends and hem one long side for each ruffle.


Mark the middle of each of the ruffle strips and of the bottom of the skirt with pins. Run a gathering stich on the top of the raw edge of each ruffle strip. I use the setting on the pic above for a perfect basting stitch.

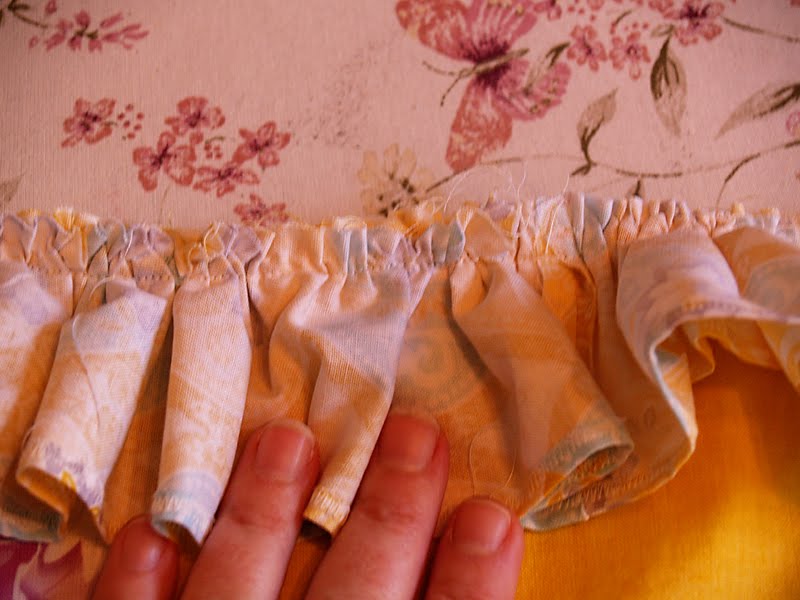
Place the ruffle strips right side down onto the right side of the skirt bottom, matching centers. Make sure you have the little (3”) strip first on the skirt bottom.


Fold the edges of the ruffles in and sew the hem down. Press the ruffles down and top stitch close to the seam.

***here’s what it looks like so far!***


Let’s add our waistband. Match the middle of the raw edge of the waistband to the middle of the top of the skirt. Pin, sew, iron and top stitch! Make sure you have ironed all the way to the ends of the waistband ties so when you top stitch you will have the whole waistband all hemmed up!


Mark the raw edge of the top (the open edge). From the right side, measure and mark at 2”, 2.5”, 9.5” & 10”. Mark on both sides of the top.


Place the straps inside the top, in between the outside mark and the side edge matching the raw edges. Pin the straps inside the top, including the little strip folded in half with D-rings inside the fold!


Fold each side of the pleat on the top toward the outside seam. (see above pic for exact pinned pleat) Sew the edge leaving a 3 inch gap to turn the top right side out. Make sure that the straps are placed exactly where you want them.

Turn the top right side out, fold in the opening, iron and top stitch! Yay!!! Your top looks good!!!


Mark the middle of the bottom of your top piece. Mark the middle of the top of your waistband. Match and pin the top to the inside of the waistband. Sew that sucker on there. You can sew over the top stitching of the waistband to keep the front looking neat…or not…it’s up to you!
***Basically, you are done!! If you want to add embellishments, you can!***


Take another piece of fabric from your leftover stash of FQs, and cut it to the size you want. I made my pocket long so I could fit wooden spoons in it without them falling out!! J

I added a piece of eyelet lace binding on the top. Then I sewed it down on my skirt! I also added a sweet purple antique button on one of my fave crocheted flowers on the edge of the pocket.

**Voila! A pocket full of wooden spoons!!**

And another button on a crocheted flower…I love these things!!
And my finished apron…


Thank you sooo much for your wonderful welcome!!
Thanks to my sweet friend Julie for having me hijack *ahem* i mean, visit over here!!
Please come and visit me over at my Blog, Sally's Angelworks, for more of my sweet aprons! And today, a special surprise for all of my new friends!! a wonderful Apron-y giveaway!!! yay!!! :)


Wonderful, wonderful!!!
ReplyDeleteEven better, I get to be the first to make a comment!!!
Have an awesome day!!
It's gorgeous Sally!!!! I love the yellow fabric you picked =D
ReplyDeleteSally, thanks for a super tutorial! I think I would like to try this...gotta go and see if I have some coordinating fabrics (might have to get with Julie on that! LOL).
ReplyDeleteWhat a cute apron. Love the pockets too. Thank you very much for the great tutorial.
ReplyDeleteBeautiful.Fabrics,colors,are just lovely.Thanks for the tutorial.
ReplyDeleteWhat a well thought out , great tute... good job Sally
ReplyDelete