Welcome to the National No Housework Day Online Blog hop! If you have arrived not knowing until now about the hop, no problem...just go back to If It's Groovy where this hop starts and work your way through. You may find games, prizes, projects and how do-you-dos along the path :) We would appreciate it if you sign up to keep in touch with us by "following" and would love your comments!
Perhaps you arrived here fromScrapbookers Anonymous. Great! Hope you enjoyed that stop and the others so far!!!
We celebrate this national holiday by scrapping today and into the weekend with projects that remind us of housework or getting away from it!!! Take the day off, put up your feet and let's hop!
Let's make this "out" box to tell everyone to get out of your craft room so you can enjoy No Housework Day, or you could say "Put it in the out box , I'll do it tomorrow", you could make a tag to indicate this is for the Honey Do List (that you will do tomorrow) you get the idea! Most of my usual followers are fabric crafters so this is right up their alley but I made this simple enough for anyone to follow. It also makes a great little accessory for a paper crafters workroom.

Supplies:
2- Fabric pieces of fabric 19" square
2- Fusible fleece pieces 19" square
2- 3/4" Grommets
2" painters tape (optional)
Acrylic ruler with 45 degree angle marking (optional)
Ribbon, and embellishments of your choice
A sewing machine
Scissors
Rotary Cutter (optional)
Instructions:
1. Cut your fabric and fleece.


 12. Flatten your corner so that your seams meet in the middle. My thumb is on the seam and underneath the other side seam meets it. This will make more sense when you do it. Put a pin in your drawn line on the seam and through to the other side making sure that it goes through the line and the seam on the other side.


Hope you enjoyed this little tutorial. If you would like to make one for yourself. I have the fabrics available in my shop. I am giving away a kit for this basket it will include the fabric and fusible fleece. Leave a comment below to be entered in the giveaway.
Thanks for your visit, please head over to see Scrapbooking SOS. Enjoy!
Perhaps you arrived here fromScrapbookers Anonymous. Great! Hope you enjoyed that stop and the others so far!!!
We celebrate this national holiday by scrapping today and into the weekend with projects that remind us of housework or getting away from it!!! Take the day off, put up your feet and let's hop!
Let's make this "out" box to tell everyone to get out of your craft room so you can enjoy No Housework Day, or you could say "Put it in the out box , I'll do it tomorrow", you could make a tag to indicate this is for the Honey Do List (that you will do tomorrow) you get the idea! Most of my usual followers are fabric crafters so this is right up their alley but I made this simple enough for anyone to follow. It also makes a great little accessory for a paper crafters workroom.

Supplies:
2- Fabric pieces of fabric 19" square
2- Fusible fleece pieces 19" square
2- 3/4" Grommets
2" painters tape (optional)
Acrylic ruler with 45 degree angle marking (optional)
Ribbon, and embellishments of your choice
A sewing machine
Scissors
Rotary Cutter (optional)
Instructions:
1. Cut your fabric and fleece.

2. Apply fusible fleece to the wrong side of each piece of fabric according to manufacturers instructions.

3. With a ruler mark all the way around the underside of both squares at 3 1/4". You can see I made a mistake so you have to do as I say and not as I do here :)


This part is optional. I wanted to quilt the outside of my box to make it more fun. If you don't want to do thus part meet us at step
4. Go to the garage and steal your husbands painter's tape. If you don't have a garage, husband, or tape you might have to go to the hardware store (but that is okay because it is shopping not housework :) ) I used 2" tape here.

5. Use the 45 degree line on your ruler lining up your corner at 2 inches. Place a piece of painters tape on your fabric along the edge of the ruler.


6. Measure over 2 inches from the edge of the tape and put another piece of tape across the fabric there. Continue until you reach the opposite corner of the square.

7. Sew down each side of the painters tape. I do not use a walking foot here becuase the fleece is fusible so it won't shift.


8. Take your tape off but don't crumple it up. Just stick it to the side of your rotary mat or something to keep it straight. You will turn the square to one of the adjacent corners and do steps 5-7 again.


When you are done you will have these cute diamonds quilted into your box.

9. Put the two squares together right sides facing.

10. Pin all the way arround leave 4-6" open on one side for turning. I like to mark my opening with 2 pins like this so that I remember not to sew through my opening. Sew a 1/4 inch seam all the way around.


11. Once you sew all the way around your square (being sure to leave an opening) put your hand inside and open up the corner like this:


It is hard to see the pin here so I made an arrow ;)

13. Pin on each side the same way making sure that the lines are meeting on top and bottom.

14. Sew on your line making sure to back stitch at both ends.

15. Repeat step 14 sewing over your sewn line a second time. Repeat for all fourcorners.

16. Measure 1/4 inch from the sewn line and cut off the corner. You will get little squares like this:


You have a little box now :)

17. Turn your box right side out.

18. Use your thumb and fingers to get the seams turned so they lay flat around the top edge of the box.

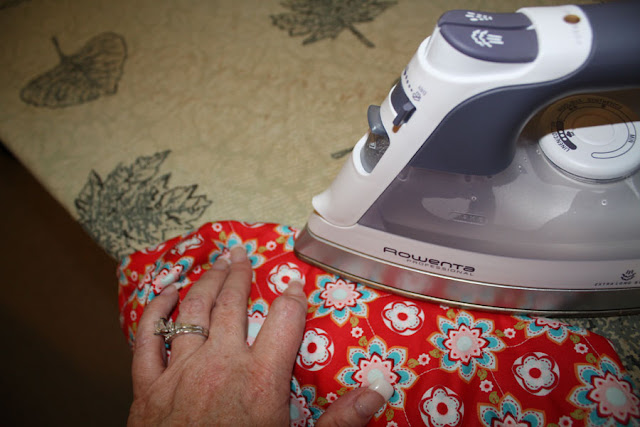
19. Iron around the top of the box.

20. When you come to your turning opening turn each side in 1/4 inch and iron.

21. Pin the opening closed with the top sides turn in.

22. Top stitch all the way around the top of the box at approximately 1/8 inch.

See here is where my opening was and you can't even tell :)


23. Turn the bottom sides down and iron to make a nice crisp square bottom.


24. Turn the corners so they lay flat and iron to crisp those up too.

Voila a box...

25. Let's make her prettier. Measure to the center of the front of the box it should be about 6 inches from each side. Put a pin in it :)

26. Measure up 1 1/2 inch from the bottom and 2 inches to each side of the pin and make a dot with a pencil.

27. Put a grommet over the dot and make a circle the size of the inside of the grommet.

28. Cut a small circle where you marked. You want the hole to be a little bit smaller than the grommet so that the edges are covered by the grommet and it's washer. This is fabric so you need to cover those edges.


I decided to use this adorable 7 Gypsies tag for my basket... I thought it was perfect with the "Do Not Disturb" but you can make your own to say whatever you like of course.

29. I used about a yard of two ribbons and tied them through the grommets.

30. Then I attached the tag and made another bow.


When No Housework Day is over you can use it for holding your 12" x 12" papers.

Hope you enjoyed this little tutorial. If you would like to make one for yourself. I have the fabrics available in my shop. I am giving away a kit for this basket it will include the fabric and fusible fleece. Leave a comment below to be entered in the giveaway.
Thanks for your visit, please head over to see Scrapbooking SOS. Enjoy!


Very cute fabric bin!
ReplyDeleteyour amazing. What a great idea
ReplyDeleteI love this box for my paperwork instead of my plastic ones. Thank you so much for the tutorial. I have to make one for myself one of these days.
ReplyDeleteAnd count me in for the 'No Housework Day'. Instead of doing my housework I am blog hopping and trying to finish a babyquilt.
I would like to make that. I totally understand your tutorial.
ReplyDeleteGreat tutorial! Lots of pictures - just how I like them!!
ReplyDeleteThat's so cute! I certainly could use some organization! Thanks for the chance to win!
ReplyDeleteLove the tutorial. I would love to win! Thanks for the chance.
ReplyDeleteso totally going to have to remember your painters tape trick for stitching straight lines!! they are just impossible for me!
ReplyDeleteCute, cute box!
ReplyDeleteVery cute idea!
ReplyDeleteCute in-box and great tutorial. Thanks
ReplyDeleteGreat tutorial, I need to make a few of these! Thanks for the chance to win!
ReplyDeleteYou are just so good!!! Wish I had some time to make one of these cuties!!! I just had to leave you a fun comment! So enjoy being your friend!
ReplyDeleteCute little box. Will have to make one one of these days... just don't know where I would want it. :)
ReplyDeleteThat is adorable, and a GREAT tutorial!
ReplyDelete(marcinegranza@charter.net)
Oh my goodness, but your tutorial was EXCELLENT. I don't sew. Let me rephrase that. I have a NEW sewing machine that is FIVE years old and never been threaded. I've been wanting to haul it out and dust it off and give it a try and your little project is just the incentive I needed.
ReplyDeleteI just found your blog on this hop and am now a follower. So very nice to meet you. Stop by my blog sometime soon and say hi.
http://lillianchild.blogspot.com
Cute box!
ReplyDeletesooooooooo cute... following you now.... have a super-fantastic-wonderful no housework day!!!
ReplyDelete{{hugs}} Michelle
Cute fabric-nice tutorial.
ReplyDeleteThanks for the great tutorial. I love the fabric.
ReplyDeleteAwesome! I love that fabric!
ReplyDeleteVery neat project!:)
ReplyDeleteKaitlin
angel1694@comcast.net
That is way cute! I love it!
ReplyDeleteDo you call this a 'little' tutorial???? Lol. I LOVE it!!!
ReplyDeleteAnd I would LOVE to win one of your kits!! Thanks for this chance!
XXXJenneke
What a wonderful tutorial. Thanks for the inspiration and this wonderful bloghop.
ReplyDeleteI LOVE that little case of paper! So so cute- I think I'll have to make one of my own!
ReplyDeleteHOLY CANOODLE! What a blog post! I love the link you mentioned in your blog post today! I am going to be a follower, love your style!
ReplyDeleteYour tutorial is amazing!! Thank you so much!! I don't live near a fabric shop so I can't get hold of the fusible padding this weekend, but it's a must-do project for later on. Thank you, thank you, thank you!!
ReplyDeleteThanks for the tutorial =) I sure can give it a try with so many pics .
ReplyDeleteThanks for the chance to win this kit =)
Love the box...great job!!!
ReplyDeleteThanks for the great tutorial! It's so pretty I don't think I would want anybody putting anything in it! :)
ReplyDeleteAwesome tutorial of a great project! Thank you so much!!!
ReplyDeleteCute idea! I have a visor/hat that my daughter made me at school that I wear to advise everyone when I'm scrapping so they know to leave me alone. This basket would work perfect for those times! :0)
ReplyDeleteLove the basket!! Thank you for the great detailed instructions!!! I will be following along!
ReplyDeleteYour method has such crisp corners and sides! Thanks for the tutorial.
ReplyDeleteThe project is adorable! Leave me out of the drawing though. I have a purse that I have been "working" on for 45 months...
ReplyDeleteOh my goodness!! Loved how it came out finally. So awesome!! I am a follower now!!
ReplyDeleteThank you for sharing!!
ReplyDeletevegeater@gmail.com
Great tutorial! You did a great job with showing every step! Thanks for being a part of the hop!
ReplyDeleteYou can email me by clicking my name and following the link.
What a beautiful in box, love, love, love this!
ReplyDeleteWow, that is great, I am now a follower of your blog. Thanks for the chance to win such great blog candy.
ReplyDeleteMarcy S.
m dot serrano at live dot com
http://marcyscreativecrafts.blogspot.com/
hopping along
ReplyDeletebargainmama@mchsi.com
omg! i love that fabric bin! thanks for the tutorial!!!! i am a follower!!! jen t.
ReplyDeleteGreat pictures and great tutorial. It's exactly what a drab desk or cubicle needs!! Thank you for all your time in creating the tutorial!
ReplyDeletewhat a lovely box! don't know if anything would go out..only come in!
ReplyDeleteGreat tutorial Julie ! Thank you!
ReplyDeleteYour tutorial is so clear and detailed that I think I can make the fabulous in box! TFS :)
ReplyDeleteHow CUTE!!! I love how you made this from scratch! Very nice! The colors and tag are super fun! I love the idea of this, my tag would read, "mom's crafting-- go away!" LOL.
ReplyDeleteI'm a new follower now!
ReplyDeleteThanks for the chance!!! :))
Love love your idea and TFS!!!!!!
ReplyDeleteBrilliant... <3 Thank you for sharing the tutorial! ps love your ring! <3
ReplyDeletegreat bin and awesome tutorial
ReplyDeleteAwesome step-by-step tutorial. Love the fabrics. Love the finished product. By all means, enter me in the giveaway.
ReplyDelete