Hey Everyone,
I am so excited to share this super fun
new toy I have. As you may know I closed the shop and moved everything home last year. So the house has been a bit messy lately with all of the shop stuff crammed in here and I hadn't had a chance to share this awesome super powerful tool with you yet.
Notice how I didn't say this awesome gadget? If you know me you know how I often say I am not a gadget girl. Before we go any further I want to tell you I am an affiliate with this company. This is a sponsored conversation written by me on behalf of Cricut. The opinions and text are all mine. Comments submitted may be displayed on other websites owned by the sponsoring brand.This really is a wonderful tool. After cutting fabric with a rotary cutter for 26 yrs my wrists are not so great anymore. This machine eliminates a good 90% of my cutting and I can be doing something else while it cuts (and marks) my fabric for me. Let me explain...
Cricut has been known as a paper cutting machine and this one does that, and so much more. But the revolutionary thing about this machine is that it has a rotary cutting blade. Other electronic machines that cut fabric only cut bonded fabric (meaning fabric with heat and bond or interfacing on the back) because they have a blade that drags across the fabric, that would be like trying to cut fabric with a knife, so it would just distort fabric and not cut well. I have other cutting machines, electronic and die cutting machines both. So I can speak to the differences.

Pictured above is the machine and the rotary blade as well as the washable fabric marking pen. I have had this machine for about a month and been putting it through it's paces. It can cut hundreds of different kinds of materials with the Adaptive Tool System. So far I have cut Leather, Book Board, Stickers, Cardstock, Paper, Felt, Peltex, Vinyl, and Fabric. There are a few different blades included with the machine to cute multitudes of different materials. This machine can take the place of all the die cutting machines that I have that cut appliques and quilt blocks because there are hundreds of images I can use in the software (Design Space) and I can also upload my own images or draw my own applique designs and upload them. And there aren't any cartridges or dies to have to store in the space I don't have anymore :)

The machine has a dual carriage so you can cut and mark your fabric at the same time. It also has regular pens you can put in and it can draw for you... what about marking your fabric for embroidery? So many uses for this awesome feature.
Here is how I used it yesterday...
I used the fabric grip 12" x 24" mat. And put the background fabric for my
Quilter's Planner Sampler block on it face down so the pen could mark the back of the fabric for me.
Then I set up the cuts and marks I wanted to do in my Design Space on Cricut's website. The machine is Bluetooth enabled which allowed me to have it in my sewing room away from where my computer is because I could run it from my cell phone ... do you believe it? So cool... and it has a docking slot to hold my phone (or iPad) and a usb port to charge it with... I digress.
I made a small mistake in my set up and it was easy to notice and pause the project, fix and restart. I am adding the picture below of another project I am working on to illustrate how perfectly this blade cuts and how accurate the marking is.
Those squares are only 3/4" and 1 1/2" and look at how perfect these half rectangles are cut... perfectly corner to corner.
And all of this is done with hardly any waste since there doesn't need to be a ton of space between the cuts like there is on die cutting machines. This is all the waste I had from the cut above.
I know it probably seems like I am going a little over the top but I am telling you this is a great machine. Also, below is a picture of the mistake I made.
I accidentally unloaded the cutting mat before I started running it and so it made the marks in the wrong place originally... why am I showing you my mistake? Because I wanted to say a quick word about the marking pen... as you can see it makes nice thin lines and doesn't bleed (the reason I never use fabric pens to mark HSTs is they bleed and make fat lines) so I actually will use this pen, and buy more when it runs out too. I had to wash it out (I always worry about that and I know I am not the only one) before I pressed my block (because of the lines being in the wrong place) and it washed out with a little bit of water and a small amount of soap with no problem.
Here is my
Quilter's Planner Sampler Block (more below about the Quilter's Planner) that I made by cutting it with the Maker machine. The pieces are perfect and the block is perfect. Accuracy make a huge difference.
Cricut has teamed up with Simplicity to bring you sewing patterns and Riley Blake to bring you quilt patterns already loaded in Design Space as well.
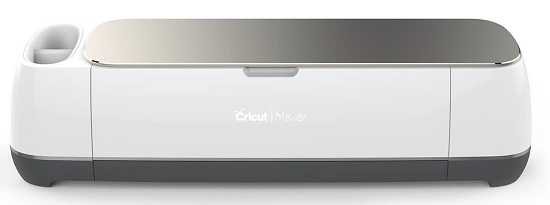
What comes in the box?
Cricut Maker™ machine, Rotary Blade +
Drive Housing, Premium Fine Point Blade + Housing, Fine Point Pen, FabricGrip™
Mat 12" x 12", LightGrip™ Mat 12" x 12", welcome book, USB
cable, power adapter, Cricut Access™ free trial membership, 50 free
ready-to-make projects, including 25 sewing patterns, materials for a first
project.
I hope you don't mind me gushing about this but I really love this machine. I am going to be creating and sharing projects with and about it in the weeks to come.
If you have a Quilter's Planner and enjoyed the stickers I created for January. Come back tomorrow for a new free sampler set for February and more about the Quilter's Planner Sampler Block :)
Love,
Julie
This is a sponsored conversation written by me on behalf of Cricut. The opinions and text are all mine.


