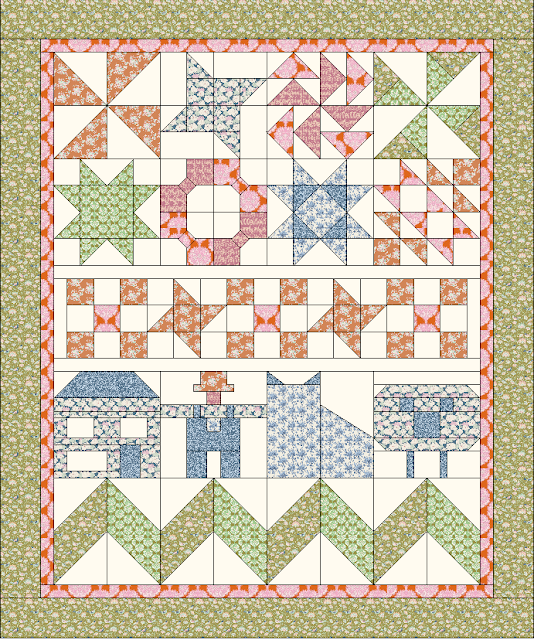
Beginnings Quilt Along - Part 1 Fabric Requirements

Tuesday, January 23, 2018
Hi Everyone,

Are you ready to get ready? Here are the fabric and notions that you will need to follow along with the Quilt Along. The fabric requirements are approximate, I made sure that you have plenty for the borders and background but how you make up the fabrics for the blocks is up to  you. You can certainly make this quilt with scraps, and it would be adorable, so the 1/4 yds are just a suggestion.


Fabric Requirements (PDF)

13 Fat Quarters or ¼ yards (1/4 yards are cheaper if you are buying off the bolt)
½ Yard of Inner Border fabric (this includes where it has been used in blocks)
¾ yard of Outer Border fabric (this includes where it has been used in blocks)
2 yards of Background Fabric (represented by the cream solid in the picture)


Basic Tools

Rotary Cutter
Rotary Cutting Mat
6” by 24” Acrylic Ruler (or similar)
8 ½” (or larger) square acrylic ruler, I use a 12 ½”.
Seam Ripper (let’s face it we all need one some time)
Patchwork Pins (I prefer glass head)
Thread

If you are on Facebook please come over and join the group so we can all share our makes. Also as we get started please share your photos with the hashtag #beginningsqal on Instagram. Each month I will send a little prize to someone that shares their photos from the QAL. Let's start with photos of our fabrics. If you want to buy a LemonTree kit (to match the picture) they will not be available until next month. I have made a few more mock ups so you can get some other ideas for colors. I also put up some kits for order

Pink Kit

Blue Kit

Teal Kit
Cottage Kit

Harvest Kit

So as my husband likes to say "Get your poop in a group", and I will see you next week.

Love,
Julie

PS. If you leave me a comment and you don't get a reply personally that means your email is not connected to your account so I can't answer. I always answer all of my comments if I have your email :)  So if you leave a question be sure to either indicate your email address or check back for a reply on the blog.

A Free Beginner's Quilt Along

Saturday, January 20, 2018
Hey Everyone,

Since I am working alone I have decided not to do a BOM this year. It is just too  hard to build the kits and get them shipped all alone. Instead I am going to do two Quilt Alongs. They will be free but I am hoping you will support me by buying some fabric to make them. Both quilts are designed in LemonTree by Tilda.

LemonTree arrives in February and I will have some kits up then for both of the quilt alongs.

This Quilt along is all about beginners. I am writing tutorials to make blocks that I made my first year of quilting (25 yrs ago). That is where the name came from my beginnings. I drafted the blocks that are not traditional blocks (the farm blocks) and as far as I know they are my own. I made a farm quilt my first year of quilting and a cat quilt but those patterns are long lost to time. So I made them somewhat how I remember them, but they are my own.

A Free Quilt Along for Beginning Quilters
 It has long been on my list to do a quilt along for beginners because I want to teach things you don't hear often anymore. A lot people teach themselves with YouTube or Google, and that is great, but sometimes you miss something when you don't learn from experience. I am here to help with that. We will get started this week and I hope you will join along with me.

The Beginnings Quilt Along - A Free Quilt Along for Beginning Quilters
This quilt is baby size 40" by 48" and would be totally appropriate for a girl or a boy (just change the fabrics).

The other quilt will be an intermediate quilt and I will show you a preview of that this week. It will be a large lap size.

Since I am doing this for free I do reserve the right to make minor changes to blocks or fabrics if I feel I need to.

Stay tuned for more info coming this week.

Love,
Julie

Quilter's Planner New Free Stickers

Monday, January 15, 2018

Free Stickers to Use in your Quilter's Planner to beautify and help you get the most out this useful tool. Click through to grab it.

Hey Everyone,

As promised here are the new free stickers for the Quilter's Planner. I am making a free sampler sheet each month and I will post it here on the blog. You can read more about it here and here. This month is the Galentine's edition. It's all about you and your bestie.
And just like last month I made a premium set of 3 sheets that you can buy here. If you decide to buy the Quilter's Planner from my link (I am an Affiliate) then email me and let me  know and you will get these three sheets (below) free. The ones you receive if you buy them won't have the watermark on them, of course. You can see larger pictures if you click the pictures.

Yesterday I talked all about my Cricut Maker. I am going to use it to cut my stickers out too. It can do so many things. I will show you the stickers in use at the end of the month when I have February planned out.

 And as I said yesterday I used the Maker to cut my Sampler Block for the The Quilter's Planner. This one:
Every month on the 15th I am going to show my blocks from the planner. It is a good way to keep me accountable. I am using the same two sets of fabrics that I used for the Honey Pot Bee blocks so I might mix them all together at the end.

Let me know in the comments if you are doing the sampler blocks too.

Love,
Julie

The Cricut Maker Cutting Machine

Sunday, January 14, 2018
Hey Everyone,

I am so excited to share this super fun new toy I have. As you may know I closed the shop and moved everything home last year. So the house has been a bit messy lately with all of the shop stuff crammed in here and I hadn't had a chance to share this awesome super powerful tool with you yet.

A helpful review of the Cricut Maker from a profesional quilter and quilt shop owner. Click through to find out if it is all it is cracked up to be.
Notice how I didn't say this awesome gadget? If you know me you know how I often say I am not a gadget girl. Before we go any further I want to tell you I am an affiliate with this company. This is a sponsored conversation written by me on behalf of Cricut. The opinions and text are all mine. Comments submitted may be displayed on other websites owned by the sponsoring brand.This really is a wonderful tool. After cutting fabric with a rotary cutter for 26 yrs my wrists are not so great anymore. This machine eliminates a good 90% of my cutting and I can be doing something else while it cuts (and marks) my fabric for me.  Let me explain...


Cricut has been known as a paper cutting machine and this one does that, and so much more. But the revolutionary thing about this machine is that it has a rotary cutting blade. Other electronic machines that cut fabric only cut bonded fabric (meaning fabric with heat and bond or interfacing on the back) because they have a blade that drags across the fabric, that would be like trying to cut fabric with a knife, so it would just distort fabric and not cut well.  I have other cutting machines, electronic and die cutting machines both. So I can speak to the differences.


Pictured above is the machine and the rotary blade as well as the washable fabric marking pen. I have had this machine for about a month and been putting it through it's paces. It can cut hundreds of different kinds of materials with the Adaptive Tool System. So far I have cut Leather, Book Board, Stickers, Cardstock, Paper, Felt, Peltex, Vinyl, and Fabric. There are a few different blades included with the machine to cute multitudes of different materials. This machine can take the place of all the die cutting machines that I have that cut appliques and quilt blocks because there are hundreds of images I can use in the software (Design Space) and I can also upload my own images or draw my own applique designs and upload them. And there aren't any cartridges or dies to have to store in the space I don't have anymore :)


The machine has a dual carriage so you can cut and mark your fabric at the same time. It also has regular pens you can put in and it can draw for you... what about marking your fabric for embroidery? So many uses for this awesome feature.

Here is how I used it yesterday...

 I used the fabric grip 12" x 24" mat. And put the background fabric for my Quilter's Planner Sampler block on  it face down so the pen could mark the back of the fabric for me.
Then I set up the cuts and marks I wanted to do in my Design Space on Cricut's website. The machine is Bluetooth enabled which allowed me to have it in my sewing room away from where my computer is because I could run it from my cell phone ... do you believe it? So cool... and it has a docking slot to hold my phone (or iPad) and a usb port to charge it with...  I digress.
I made a small mistake in my set up and it was easy to notice and pause the project, fix and restart. I am adding the picture below of another project I am working on to illustrate how perfectly this blade cuts and how accurate the marking is.
Those squares are only 3/4" and  1 1/2" and look at how perfect these half rectangles are cut... perfectly corner to corner.
And all of this is done with hardly any waste since there doesn't need to be a ton of space between the cuts like there is on die cutting machines. This is all the waste I had from the cut above.
I know it probably seems like I am going a little over the top but I am telling you this is a great machine. Also, below is a picture of the mistake I made.
I accidentally unloaded the cutting mat before I started running it and so it made the marks in the wrong place originally... why am I showing you my mistake? Because I wanted to say a quick word about the marking pen... as you can see it makes nice thin lines and doesn't bleed (the reason I never use fabric pens to mark HSTs is they bleed and make fat lines) so I actually will use this pen, and buy more when it runs out too. I had to wash it out (I always worry about that and I know I am not the only one) before I pressed my block (because of the lines being in the wrong place) and it washed out with a little bit of water and a small amount of soap with no problem.

Here is my Quilter's Planner Sampler Block (more below about the Quilter's Planner) that I made by cutting it with the Maker machine. The pieces are perfect and the block is perfect. Accuracy make a huge difference.

Cricut has teamed up with Simplicity to bring you sewing patterns and Riley Blake to bring you quilt patterns already loaded in Design Space as well.
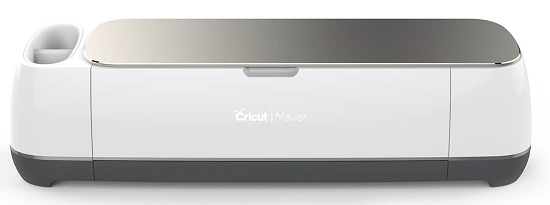


Cricut Maker Machine


What comes in the box?

Cricut Maker™ machine, Rotary Blade + Drive Housing, Premium Fine Point Blade + Housing, Fine Point Pen, FabricGrip™ Mat 12" x 12", LightGrip™ Mat 12" x 12", welcome book, USB cable, power adapter, Cricut Access™ free trial membership, 50 free ready-to-make projects, including 25 sewing patterns, materials for a first project.

I hope you don't mind me gushing about this but I really love this machine. I am going to be creating and sharing projects with and about it in the weeks to come.

If you have a Quilter's Planner and enjoyed the stickers I created for January. Come back tomorrow for a new free sampler set for February and more about the Quilter's Planner Sampler Block :)

Love,
Julie
This is a sponsored conversation written by me on behalf of Cricut. The opinions and text are all mine.

My 30 Day Art Challenge, What's Yours?

Tuesday, January 9, 2018
Hey Everyone,

In an effort to "Take back the Joy" like I mentioned last week, I have decided to try to learn to draw better and learn to use watercolors... so each day I am doing small drawings and pattern paintings in 30 day challenge classes by Lisa Congdon.

I think this one is my favorite so far.
These classes are on CreativeBug I am an affiliate so if you click and join I do get a few pennies at no extra charge to you.

Daily Painting Challenge: 31 Patterns to Paint taught by Lisa Congdon.
 
This was my first day on the challenge.
But I have to tell you that I don't endorse just anything and I truly love CreativeBug. It is just a $4.95 a month and there are thousands of classes you can watch as many as you want. Teachers like Anna Maria Horner, Heather Ross, Lizzy House, and Amy Butler.

Teacups are hard

You also get one class to save each month that you will have access to forever. End sales pitch... I just honestly do love the site so I want to share.

The roses are cute right?

Next Wednesday I will have the new stickers (like this) for the Quilter's Planner up for you. They are so cute for February... girlie ones this time. I love making stickers but they are pretty labor intensive :)

Chairs are hard too but I really want to learn them so I am going to practice more.

Leaves... today I am going to paint Leaves I will show you next week.
These Paisleys took forever

And so did this Harlequin

Tell me if you have any challenges that you have set for yourself this year. I would love to encourage you on your way.

Love,
Julie

Taking Back The Joy

Tuesday, January 2, 2018
Hi Everyone,

It is the second day of 2018 but the first day of the rest of your life. If you have been around here a little while you might realize life has been a bit hard for me over the last couple years. So this year is going to be the year that I "Take Back the Joy"!

I chose Joy as my word for this year a couple months ago. I told my daughter that we are going to Take and Bring back the Joy this year one day on our way to her school in November, and since then I have been thinking about it and planning it.

If you go back in my blog archives and look at my first couple years of blogging you will see that I used to have a lot of fun so let's get back to that shall we? I have big plans for the blog this year and I will reveal them a little at a time as we go. Some will be about sewing some will be about journaling or learning new art forms. So grab your planner and let's get to it :)

Did you choose a word for the year? If so why not comment and tell me what it is. It is always more fun to take a road trip with a friend or two.

Much Love and Joy,
Julie

Custom Post Signature

Custom Post  Signature