Showing posts with label Cricut. Show all posts

Easy Christmas gifts with the EasyPress 2

Tuesday, November 20, 2018
Hey Everyone,

I know I have been talking a lot about my Cricut machines lately but I am always surprised how much I use them. I have so many new ideas for projects to use them with.... you all may not believe it but I do not cut quilt blocks with my rotary cutter at all anymore. Right now (since I had abdominal surgery 5 weeks ago) I can't even use my rotary cutter at all because my cutting table hits right at one of my incision points. (links in this post may be affiliate links) So my Maker (it i on sale right now) is my best friend right now. Here are my machines!


Cricut's new EasyPress 2 has been my favorite toy lately. It is 20%-30% off right now It is so amazing for making so many different things.I have the original EasyPress as well but there are some significant upgrades with the EasyPress 2. It heats up faster and has a thicker ceramic plate so the heat is more even all over the device which makes the iron-on material stick more consistently. It also gets hotter which allows it to support pressing onto a lot of new materials. My original was the original single size of 9" by 9" but the EP2 has two new sizes (in addition to the original size) that I actually use much more than I did the original size, 6" by 7" and 10" by 12".

Here are a couple projects that I used the tiny one on...

Cute Christmas Ornaments/Pincushions

My own design T-shirt

Another T-shirt I designed

I painted this then applied the white portions in Iron-on
The tiny EasyPress 2 was perfect for the ornaments and the little art canvas (it would be perfect for baby onsies too).  I really could have used the Biggy EasyPress 2 for the t-shirts. I had to press multiple times to cover the large designs but with the big one I will be able to do the whole designs at once when I do them again. I have plans for a fun banner/flag for winter that will be great to use the big one on as well.

I love the Raspberry color and it goes nicely with the new Rose colored Maker too :) 


And just a word about the EasyPress Mats they are so perfect for using on my craft surface (cutting mat) they are 5 layers of protection against the heat and they are soft and mobile so I can throw them on a shelf when I don't need them or put them on my cutting table for a perfect place to press with the EasyPress or my Iron. These are on sale half price right now and they are great portable ironing mats.

This is a sponsored conversation written by me on behalf of Cricut. The opinions and text are all mine.

Comments submitted may be displayed on other websites owned by the sponsoring brand.

I would not volunteer to talk about these machines so much if I didn't really love them and really use them.

Hope you have a great Holiday weekend!

Love,

How to make a Bohemian Style t-shirt with Cricut EasyPress 2

Wednesday, September 26, 2018
Have you ever wanted to make your own t-shirt design? Do you have a great saying that is quintessentially you that needs to be displayed on your person? Is it hard to find graphic t-shirts in your size or in a style of t-shirt that you like? I am going to show you how to make your own on a t-shirt that you already love with the Cricut Maker and the Cricut EasyPress 2.

Bohemian Embroidery Cricut EasyPress 2 Tutorial

Links in this post may be affiliate links. If you decide to buy something then I might get a bit of compensation for my time and effort at no extra cost to you. This post is sponsored by Cricut.


I know sometimes the most daunting part of getting a new gadget is how to use it and in this case it is just a matter of learning to use the software. It is not hard at all, if you can use a sewing machine you can do this, I promise. I made this video to show you how I made my designs:


I walk you through my design process in the video so it is a little bit longer than my usual videos.

Here is a link to the design that I used for the teal over dyed t-shirt and the tattoo designs that I can't wait to put on my sleeves.  

Now you have heard all about the Maker from me before. So I don't need to tell you how much I love her.

When you open these designs they will look something like this:


At the bottom you will see a button that says customize. You will click on that button.


The Design will come up and you will see all of the pieces that you or I have put in. In this case I made this design in a few colors. I thought it would be cool to cut it out of a bunch of colors and layer it to make an embroidery type design. I didn't want to make this first tutorial too complicated though so I am just using the white this time around. 

 Since this design is already ready to cut for you all you need to do is click Make It (the green button).
 Here on the left side just under the space that says 12"x12" (that is the size of your mat by the way) there is a little toggle that says Mirror and then a switch and you can switch that on and off. If you are cutting something that has a left and right and needs to go the right direction (like words) then you need to switch the mirror on. The reason that you have to mirror is that you will be cutting from the back of the material. 

Click the continue button at the bottom.
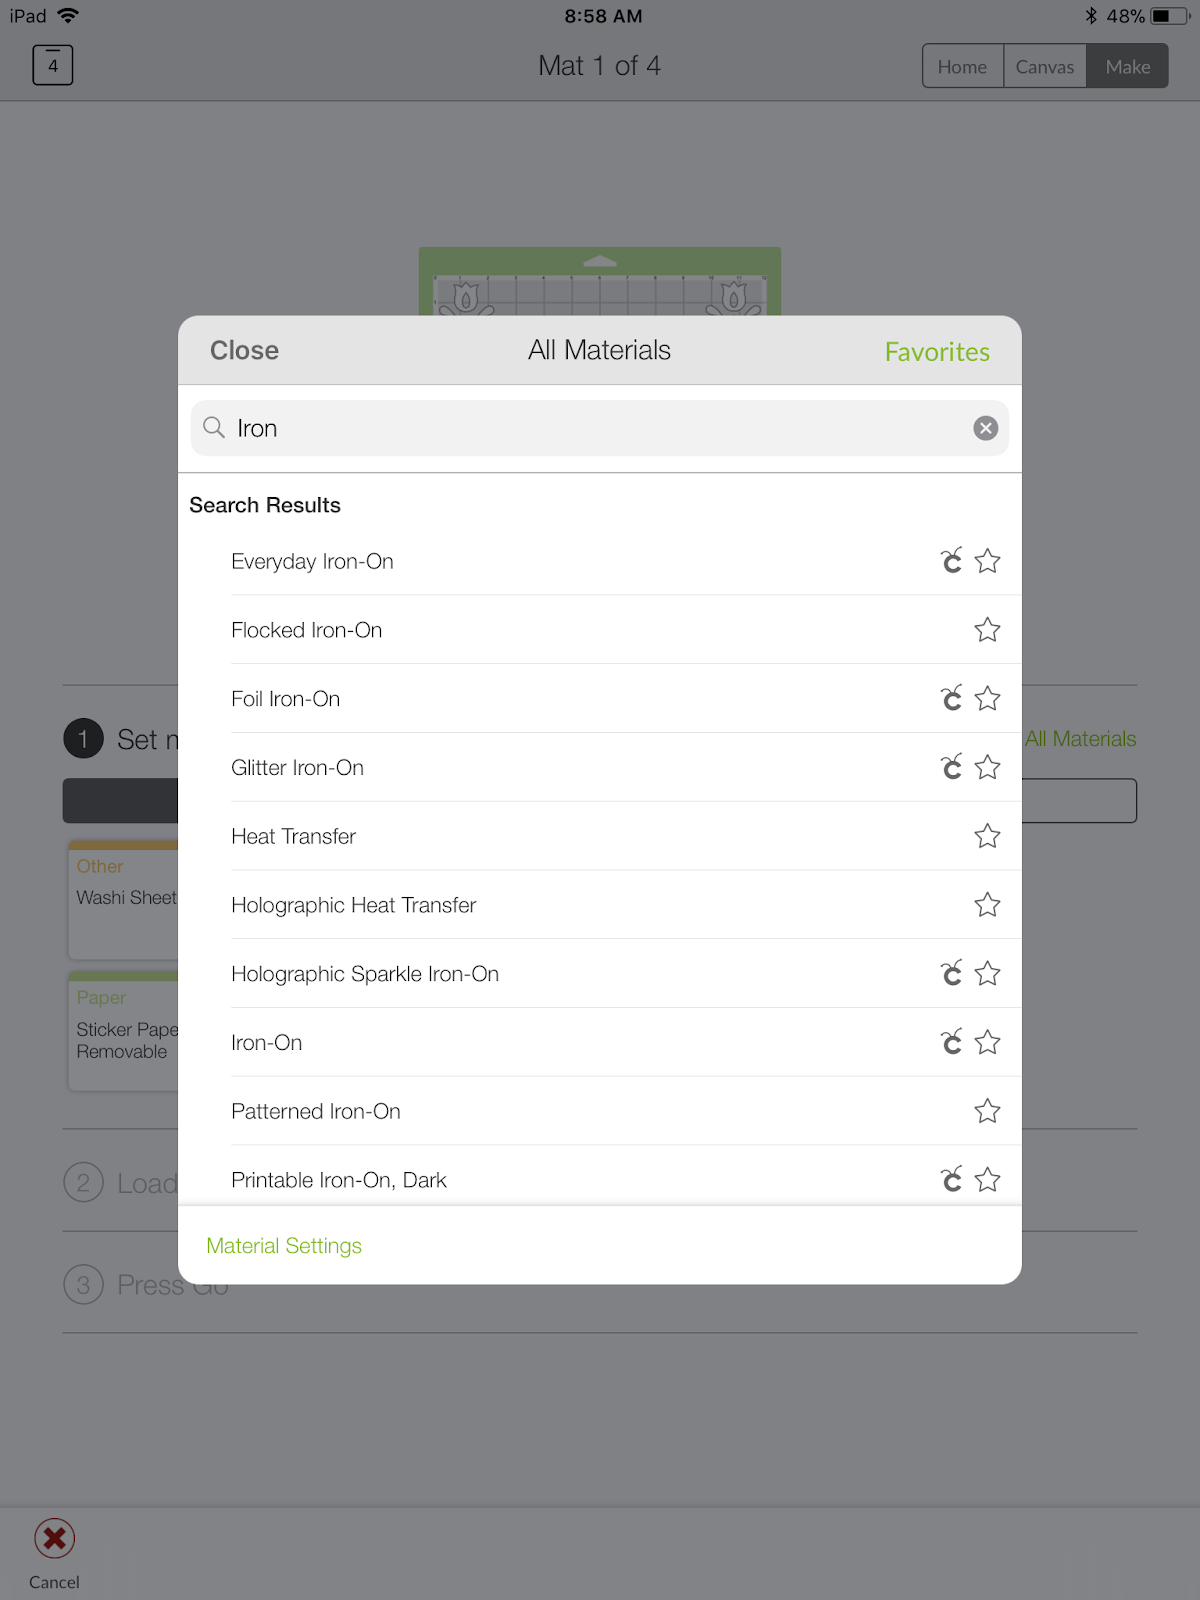
You will get a cutting screen like this... It gives you three steps and all you have to do is follow the numbers. You will choose your material that you are cutting. As you can see the favorites that I have set are here on the screen... I cut a lot of cotton with my Maker :) ... but since the Iron On is not on my favorites I will search for it by clicking the green writing that says "All Materials"
In the Search bar I just type "iron" and these pop up for me. I can choose the kind of Iron-On I am using. In this case I just choose regular Iron-On. The patterned iron-on that I used for my purple shirt (I will show that a little later) is lighter so I would definitely want to use the proper setting for that.
Once I choose the proper material the second step is to load the mat with the material and put in the proper blade. The software tells me which blade to use and how to load the mat.

I place the vinyl shiny side down on the mat and use my brayer to smooth out the air bubbles.


 Third step tells me to press Go. And once you are to this step the machine Go light will start flashing:
It's the one that looks like a little "c" with antennae.

Press the button and watch it do it's thing...

 Once it is done you will have to weed the vinyl. What that means is you will have to remove the excess material from the transfer tape so that you have just the design that you want on the tape. There are great tools for this called weeding tools they look like this:


These are the designs that I am using. I left some of the pieces in that could have been weeded out because I liked the designs a little simpler. This was a simple one to weed it only took about 3 minutes. I had a video but thought it was too boring :) Then I added it to the end of the video I linked above :)


Next I used the washable marker to mark the center of my shirt at the top and a few inches down so I could get my design straight.
Then I placed the design on the center and lined it up to make sure that it looked how I wanted it to.


Then I plugged in my EasyPress 2. 
And my whole world changed... just kidding but it was pretty epic! The EasyPress 2 is so awesome. For one thing it comes in 3 different sizes. There is one that fits every project. For the t-shirts there is one the is 12"x10" so it can cover the front of the t-shirt easily. There is a nice 9"x9" to fit kids t-shirts or a maybe a pillow. And the cute little mini that I have is 6"x7" which is great for baby onsies, sleeves, pockets...and all of your small item needs. As you will see the small one works great for the t-shirts too. So really pick the size that you think you will use most but know that they all will work on pretty much anything :) 

I use the easy tool at this link to figure out how hot to set my temperature and how long to press my project. It heats up super fast, much faster than my iron and has a ceramic heat plate that ensures you get even heating across the whole surface. It goes all the way to 400 degrees. I am so amazed that you can get professional results in less than a minute with these easy portable machines. PS. isn't that raspberry color so awesome?
I put the EasyPress Mat inside the t-shirt in preparation for pressing. It keeps the press from damaging any surface that you are working on. Oh and while I am mentioning that (surface protection) the press itself comes with an insulates safety base that it sits in while it is heated that protects your work surface as well. as you can see I am using the mat on top of my cutting mat and doesn't hurt it at all.
Following the guide I pre-heat. Then position my iron-on. Then use the EasyPress 2 by placing it on, applying light pressure and pressing the Go button... it counts down the time for me and when it beeps it is ready to be removed. I was going around the v-neck on this t-shirt so I pressed it 3 times in all. Then removed the transfer tape. You can see video of that process at the end of the video that I linked above.

Then I applied the designs to the sleeves the same way and Voila! I was a little worried to use this on one of my favorite t-shirts since it get's washed often but the Cricut Everyday, Glitter and Sportflex Iron-On are all designed to go through 50 or more wash and dry cycles... Not only that but most of their Iron-On materials have a Stongbond Guarentee that says if they are applied according to direction they are guaranteed and they will be replaced for free if you are not satisfied.


Here the other shirt I made that I really love.. I am hoping to make a little collection of sewing and quilting related t-shirt designs.

Quilter's T-shirt
I used glitter iron-on and a patterned iron-on by Anna Griffin.

I hope you love this and I will see you next week with ALL ... yes I said ALL of the rest of the blocks for our Beginnings QAL.

Love,

This is a sponsored conversation written by me on behalf of Cricut. The opinions and text are all mine.

A Giveaway and Public Service Announcement

Thursday, May 31, 2018
Hi Everyone,

How would you like to get this adorable enamel Mushroom mug (that I picked up just for you at the famous Powell's Bookstore) filled with charms of Mushroom and Flower fabric from Sarah Watts and Melody Miller of Cotton + Steel, and some other fun goodies from Market? If so... read on...

(Links in this post are affiliate links, I get a few pennies for promotion at no extra cost to you.)

My first PSA is about Cricut... if you have been on the fence about buying a Maker (intro post here) now is the time they have a super promo The More You Spend, The More You Save! Valid 5.30-6.5.
You can get a bunch of $ to spend to buy accessories.

They also have Free economy shipping (US & Canada) on orders of $99+ using code: MAYSHIP

And a great deal on the Easy Press (it is a special iron for making fun t-shirts) it has the perfect heat settings for iron on heat transfer.  Bring on the heat. Take $20 off Cricut EasyPress.Valid 5.30-6.5.

Last but not least... I have been wanting to tell you about Creativebug... as you all know I love Creativebug. I have been a member for a few years now and every once in a while I tell you guys about them. They have great teachers! Including Anna Maria Horner, Amy Butler, Lizzy House, Heather Ross, and Carolyn Friedlander... honestly it is great. The reason I am talking about them now is they have a special if you sign up now 1 Month for $1  you can do as many classes as you want... and Sonya Philip of "100 Acts of Sewing" with her hot patterns is teaching her three basic pattern classes. Tunic No. 1, Pants No. 1, and Shirt No. 1.
 
The patterns alone would cost you close to $50 this is a great deal folks. If you want to sign up just click on the picture to go to Creativebug.

Look at this Quilt with Anna Maria:


Plus they have painting, cooking, knitting... it's great!


Megan was the only comment for the giveaway so she wins! Woot! Giveaway is over :)

Manicure Mitts Free Project

Monday, March 26, 2018
 Hey Everyone,

Welcome to the Cricut Self Care Blog Tour!
I made these cute mitts for you. I used to be a manicurist. It is true. In a past life LOL In our shop we had a heated oil bath that you dipped your hands in then we had special soft mitts that you could put on and let the oil soak in without it getting on everything. That is where I got the idea. To be honest I have been wanting to make these for myself for a long time so this was the perfect excuse to give myself a little self care.


If you missed it, there is a list of everyone else on the tour on my last post.

Be sure to see the giveaway at the end of this post.

These mitts are so fast and easy they would make a great present for a girlfriend. Add some polish and maybe make a little zip pouch to keep them in.


Manicure Mitts Free Pattern


Supplies:

¼ yd External Fabric (I suggest quilting weight cotton)
¼ yd Lining Fabric (I suggest soft jersey knit, fleece, or minky)
Thread
Proper Machine Needles (ballpoint if you are using knit)
(This is an affiliate link) Cricut Maker Cutting Machine

You can find the file for these mitts on Cricut Design Space at this link (I drew them myself using the design shapes so that you could easily download and cut the pattern):


I have also added a template pattern to the download.

Cutting:

If you are cutting with the Maker cut the pattern once with the exterior fabric and once with the interior fabric. From each of the fabrics cut two mitts with template right side up and two with template right side down. You should have 8 pieces when you are finished cutting. 


Instructions: Seam Allowance is ¼ inch unless otherwise stated. Here is a video with instructions as well.


1.       Place each external piece right sides together with a matching lining piece. With the external piece on the bottom sew the wrist edge only. Leave a 2” opening in the center of each of the pieces that have the thumbs facing to the right for turning.

2.       Open up and lay the pieces flat. Press toward the external pieces. Place the pieces right sides together matching the lining pieces and the external pieces with their counterparts. Sew all the way around starting at the seam of the external pieces and sewing around to the seam on the opposite side of the wrist. If you are using a knit for the lining switch to a ball point needle and sew the lining. It will look like the photo at the right.
3.       Clip into the thumb notch all the way to but not through the stitching.

4.       Clip all of the curves.

5.       Turn out through the opening at the wrist.


6.       Press. Press seam allowance under at the opening. Top stitch close to the edge of the wrist catching in and closing the opening.

Slather your hands up with a moisturizer (Olive Oil and Coconut Oil are my favorites) and put on your new gloves to keep the oil from getting on things while it penetrates into your skin. These are a super simple fast project for a gift. You could grab some pretty polish, cuticle oil, and a cute nail file and wrap them up for a quick birthday present.

Now for the fun Giveaway:
 I am giving away a free download of the pattern for the Gabriela pajamas above. Can I just tell you how excited I was to see that they have my size? Also the pattern has all kinds of help for fitting. Honestly you are going to be amazed at the amount of information in this pattern. You can make it as shorts, below knee, ankle, or footie. You can customize the sleeve length. The sizes are 00-36 ... I think everyone in the family needs these. Look here to see it in sizes similar to yours. On real women.

To enter to win the pattern. Do one or all three of the following and leave a separate comment for each thing that you do.

1. Follow me or let me know that you already do.
2. Subscribe to my YouTube
3. Repost on your social media of choice.

I will draw a winner on Monday, April 2nd.

Hope you love it!
Julie

Custom Post Signature

Custom Post  Signature