Helen’s
Wonky Friendship Pillow
A tutorial from Sally’s Angelworks
Hi everyone! Sally from Sally's Angelworks here to share with you a sweet pillow tutorial inspired by this awesome fabric, Helen's Garden designed by Tamara Kate for Michael Miller. You can pick this fabric up in Julie's store right here!!! Enjoy the tutorial!!


Supplies:
Scraps from patterned Helen’s Garden
fabrics (you will have plenty to make several pillows if you order fat quarters
of 9 different patterned fabrics!)
½ yds each of two contrasting
background Helen’s Garden fabric
22” batting square
22” zipper
Poly-fil Stuffing or a 20” pillow
form

Cutting:
**For the Wonky Friendship Star
Blocks (4 of them!)
Background fabric > 16 – 2 ½”
squares
4 different patterned fabrics > 5
– 2 ½” squares
4 contrasting patterned fabrics >
4 – 2 ½” squares
**For the Pinwheel blocks (5 of
them!)
Background fabric > 10 – 2 7/8”
squares
5 different patterned fabrics > 2
– 2 7/8” squares
**For background fabrics: sashing,
borders, and backing
Sashing: 10 – 6 ½” x 1 ½” rectangles
10 – 4 ½” x 1 ½” rectangles
Borders: 2 – 20 ½” x 1 ½” strips
2 – 18 ½” x 1 ½” strips
Backing: ½ yard cut into fat
quarters.
**Use a scant ¼” seam allowance
throughout all sewing unless otherwise noted!

For the Wonky Friendship blocks,
you’ll want to match up your main fabrics with your little wonky triangle
fabrics and get them ready for assembly!

Start with laying out your 9 patch
block.

Take your accent fabrics (4 squares)
and cut them on the diagonal down the middle.

Here’s the trickiest part of the
pillow. Place your accent triangle anywhere right sides together with your main
patterned block with the point of the triangle away from the corner of the
block. Make sure you are not really near the middle diagonal of your main
block. Sew!

It should look like this when you
are done sewing.

Flip your triangle with the right
side up and press with your seam toward your triangle.Sew another triangle on
the opposite corner!

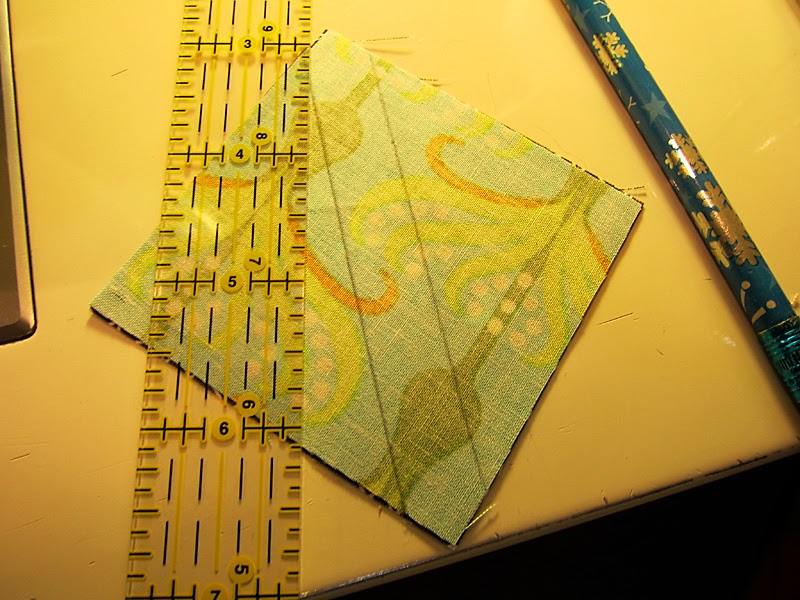
Flip your square over where the
wrong side is up. Take a 2 ½” ruler and trim the excess of your triangles off
of the 2 ½” block. (a regular ruler works, too!!)

Repeat for all four outer blocks.
The middle block will stay as it is!
**hint: refer to the drawing at the
top of the tutorial to see which way to place your triangles. In my final
project in all four of my wonky friendship blocks, I only misturned one block!

Sew your block together in rows and
then all together! * another hint: be careful not to pull your triangles when
sewing them. They are cut on the bias and easily stretch! This will distort
your final block. (really wonky isn’t that aesthetically pleasing! LOL!!)
Do these steps for all four blocks!
For the Pinwheel Blocks (make 5!!):
Place a background 2 7/8” square
right sides together with a patterned 2 7/8” square. Draw two lines on either
side ¼” away from the middle diagonal. Sew on these lines. Cut in the middle of
the two seams. Open and press your half=square triangles.

Place them in patterned order to
form pinwheel blocks!

Place the sashing around these
pinwheel blocks.
Add the 4 ½” strips to the top and bottom and then the 6 ½” strips on the sides of the pinwheels!

(this pic is to show how the blocks
go together, even though four of the pinwheels don’t have their sashing!)
Finish your pinwheels with the sashing!

Sew together your blocks in rows!

Add your borders…

Add your batting and pin baste (you
won’t have a backing yet…)

Quilt your pillow top however you’d
like. I used big straight line quilting.
To keep it straight, I used a piece
of masking tape.

When I was done quilting, I
zigzagged the edges. This helps me to keep it all together when adding the
backing! J

Grab your zipper and one of your fat
quarters. Place your zipper face down matching the top edge with one of your
fat quarters (on the 21” side) centering it on the raw edge. Leave about 2 ½”
to 3” on either side of your zipper. You’ll want to trim the bottom of your
zipper for that.

Pin it and then using a zipper foot,
sew close to the teeth on the side closest to the top edge.

I added just a little itty bitty
seam at the bottom of the zipper just on the top to add some stability at the
bottom.


Place your other fat quarter face up
on your table and place your other side of your zipper with raw edges meeting
at the top. Again, sew using a zipper foot! **Hint: just sew the zipper on
leaving a little bit of tabs on either end.

When sewing the ends on either side
of your zipper, pull out the tabs of the zipper ends to “bury” them! Sew the
ends of the two fat quarters.

**remember! Pins are your best
friends!

This is what your right side of your
back should look like! It’s going to be a lot bigger than your pillow top, so
that you can place that zipper wherever on the back you want it!

Place your pillow top on top of your
back with right sides together. Pin! Make sure that your zipper is open a
little bit for turning the pillow right side out. Trim your backing to match
your pillow front! Sew all four sides.

Open your zipper more to turn your
pillow inside out. **Hint: I trimmed my corners before I turned it to make my
pillow corners sharper.


After turning your pillow inside
out, fill it with either a pillow form or poly-fil!! And you’ve got yourself a
pretty pillow!!


Thanks so much to Julie and the Intrepid Thread for sponsoring this project!!! For more wildness, pillows,
quilts, and aprons, come on over and visit me at my blog: http://sallysangelworks.typepad.com!
Let me know if you make this sweet
little pillow!!
Blessings!


Great Variation of the normal plus-block!
ReplyDeleteThanks for the tutorial!
ReplyDeleteFantastic pillow! I love it!
ReplyDeleteThat is a gorgeous pillow! Nice tutorial too. Thanks!!! I am seeing it in red... maybe pink too!
ReplyDeleteFabulous pillow tutorial, love that fabric collection, too!
ReplyDelete